
My Pet Portrait Acrylic Painting Process
I go into detail on the steps I generally go through to create a pet portrait. Listing my processes and techniques.
William Ruhlig
1/9/20267 min read
One of the most common questions I’m asked about my art is "why do you do that that way" when referring to one of my art time-lapse videos (instagram)
Every acrylic pet portrait I create follows a careful, considered process. It’s not just about copying a photograph — it’s about capturing personality, expression, and the small details that make your pet yours. Below is a step-by-step look at how I create my acrylic pet portraits, from the first reference image to the final varnish and packaging. They don't all end up following the exact same steps, but its a good general overview of how I go about it. (and its definitely not the only or "right" way to go about things). For wildlife art sometimes ill do slightly different techniques to emphasise different aspects of the animals or environment.

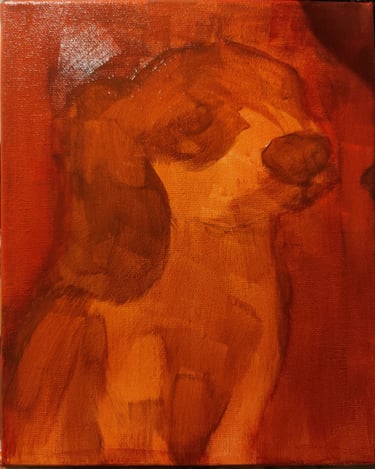
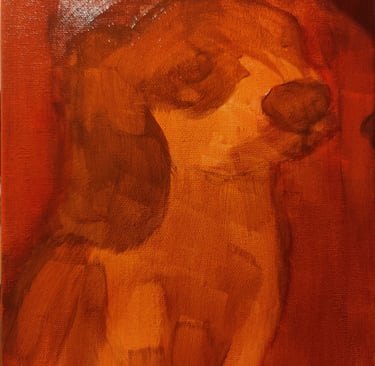
3. Creating the Underlayer Wash
Once the sketch is complete, I apply a thin underlayer wash. This initial layer sets the mood and tone of the painting, Also helps flatten any irregularities in pre-primed canvases and fills in the canvas with colour so you can see any areas you missed detailing.
Rather than starting with bright colours, I use muted warm tones to:
Establish light and shadow
Map out the overall colour harmony
Avoid harsh contrasts later
This step gives the painting depth from the very beginning and helps unify the final colours.
A warm colour here really filters through the whole image. Acrylics are never really fully opaque, each layer has an effect on the ones above. doing layers like washes helps build depth. If you use a cool colour wash it will come through as a muted and cold portrait in the end, great for certain landscapes or ideas but not necessarily the love for a pet!
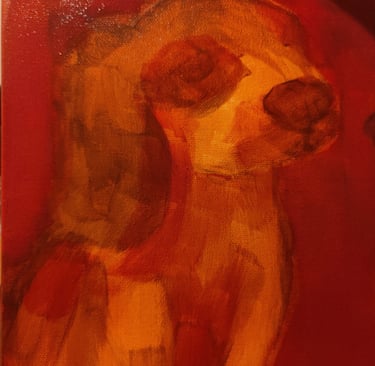
4. Building Base Layers and Core Colours
With the underlayer in place, I begin applying the base layers of colour. This stage focuses on large shapes and mid-tones rather than detail.
At this point I:
Block in fur colours
Establish background tones
Define major facial features
I work patiently, letting layers dry before adding more, othewise you get nasty muddy mixing. I avoid using pure blacks in my paintings and build up with bright and colourful brush strokes.
Often the outlines of my initial sketch can get lost here, what isn't replaced by smaller matching areas of blocked out colour sometimes ill replace with a light re-sketch or ill just infer later on. its much easier when you have your reference and matching shapes around it.
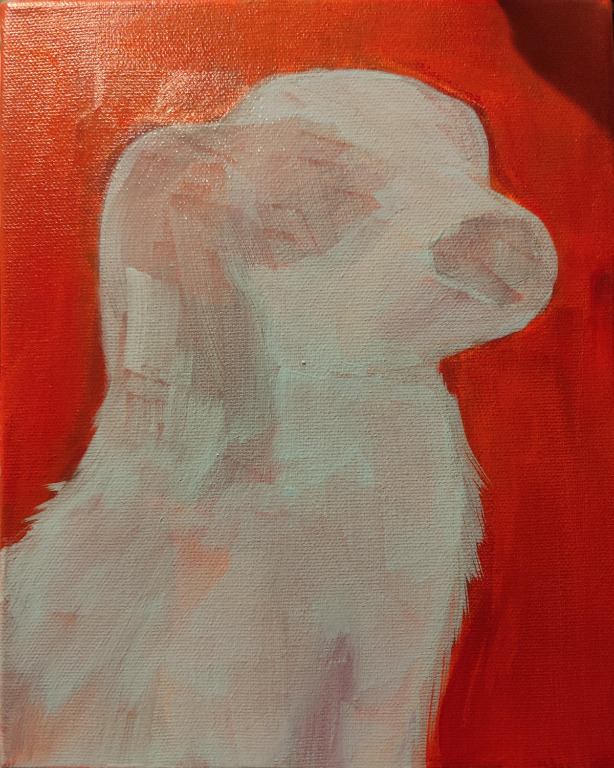
5. Developing Depth: Working From Background to Foreground
To create a sense of depth, I build detail gradually, starting with the background and moving forward.
This allows:
The background to sit softly behind the subject, not having to paint this in over details later!
The pet to feel naturally separated from its surroundings
A more three-dimensional result
Each layer adds clarity while slowly building up depth of colour and gestures of strokes indicating fur and surface directions.
With landscape paintings you often work from the background in lighter colours to darker colours less obscured by haze in the foreground. I kind of do the opposite in my portraits and go from dark to the brightest sharpest and closest details. helping lift the animal off the canvas.
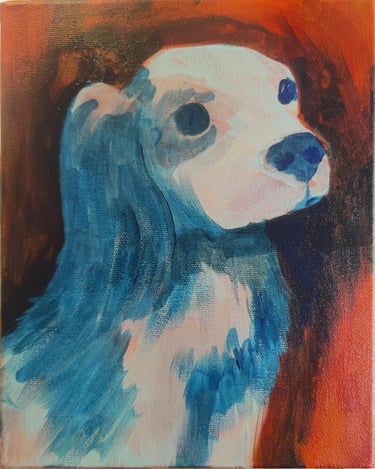
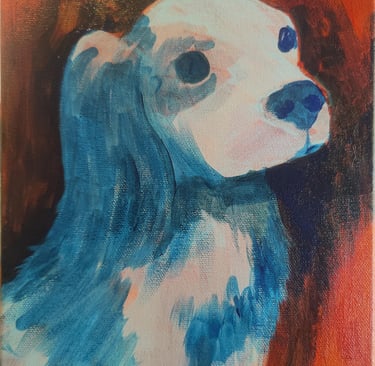
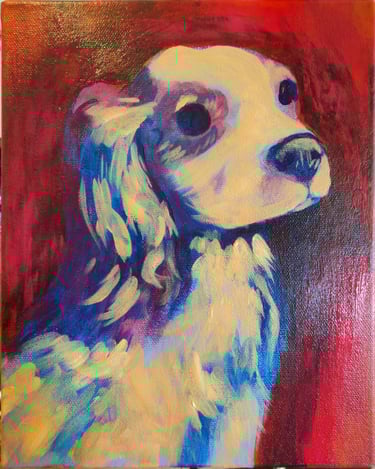
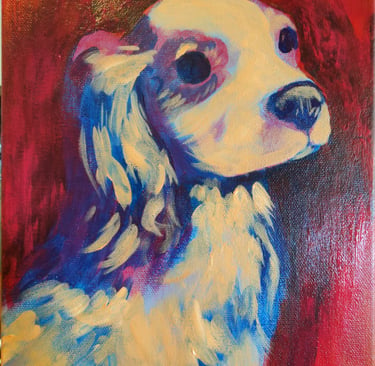
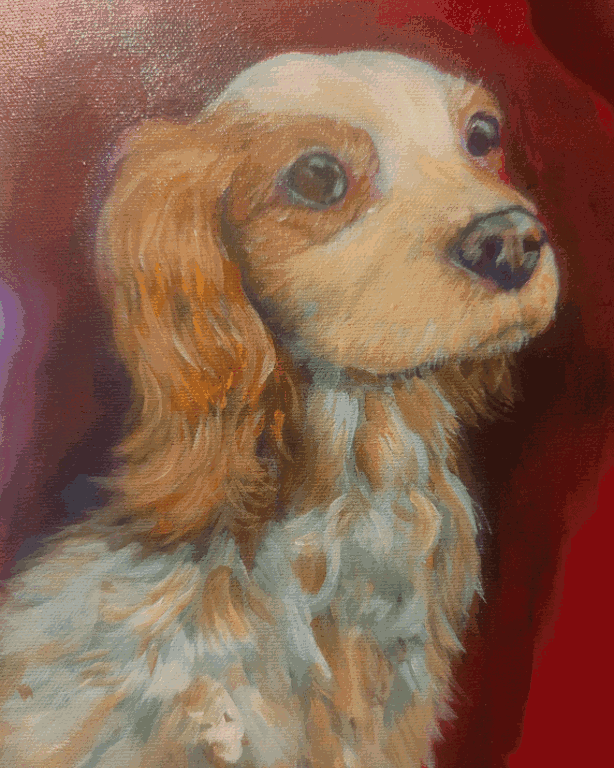
6. Refining Details: Brighter Colours and Fine Fur Work
This is where the portrait truly comes to life. While already you can see the broad strokes. here I spend the most time, adding individual hairs and small details.
I begin adding:
Brighter highlights
Fine brushwork for fur texture
Sharp details in the eyes, nose, and whiskers
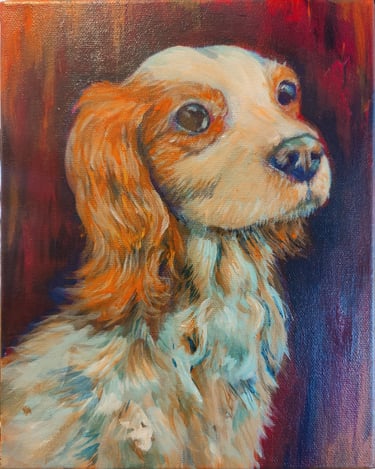
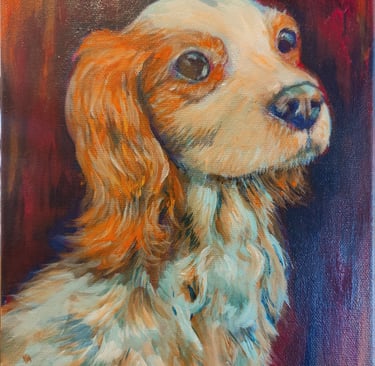
Fur is painted in layers, with lighter strands overlapping darker ones beneath. This technique mimics how fur naturally sits and helps create realism without having to paint every single hair manually. Areas closer to the viewer are more detailed, while areas further back remain softer. Here I add highlights of the sheen of bright curls of fur and the sparkle in eyes.
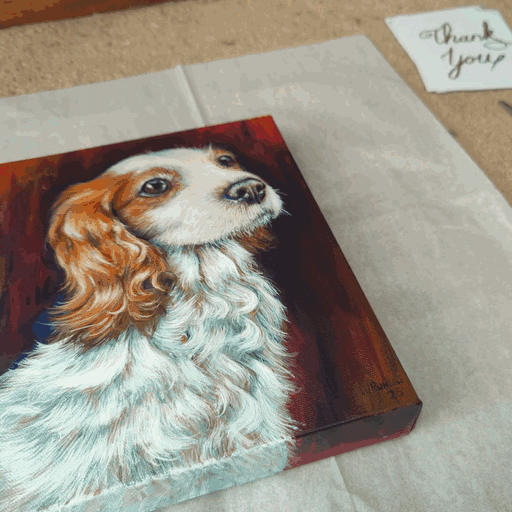
Bonus details come now. sometimes I'll get special requests. For Benji (or curly) I was requested to add his nickname on his portrait.
7. Final Varnish for Protection and Longevity
Once the painting is fully dry, I apply a protective varnish. I really love this part of the process. The sweet smell of completion. (Honestly it's not that sweet and rather strong but it's the feeling) I love the whole process don't get me wrong, this is just incredibly satisfying.
Adding a final layer of protection for the painting so it can go on for years looking as vibrant as the day it was painted. I use Winsor & Newton Matt varnish. Gloss can get distracting in my opinion. Not an ad. This is just what I use.
This step is an important ending because it:
Enhances colour depth
Protects the surface from dust and UV light
Ensures your pet portrait lasts for years to come
The varnish also gives the painting a professional, finished appearance — the final touch before it’s ready for its new home. Makes it easier to clean without as much worry of damage and keep it looking perfect for years.
8. Careful Packaging for Shipping and Delivery
Once the varnish has fully cured, the final step is preparing your pet portrait for its journey to you.
Each painting is carefully wrapped in acid-free tissue paper to protect the surface and ensure the artwork remains in perfect condition. I then include a handwritten thank-you note along with a certificate of authenticity, signed by me, to confirm that your portrait is an original, one-of-a-kind artwork. (maybe one day that slip of paper will prove you have an original William Ruhlig when my paintings soar in value, we can all dream right?)
Finally, the painting is securely packaged using protective materials designed to prevent movement or damage during shipping. I take great care at this stage — your portrait has already been created with attention and love, and it’s important that it arrives safely and beautifully presented.
No two pets are the same, and no two portraits are either. Each commission is treated as an individual artwork, not a mass-produced product. Sometimes a particular portrait might have a wildly different approach to match their personality! But I hope this gives you an idea of the steps and care I go through to give you a timeless, handcrafted piece of art of your beloved animal friend.
Commissioning Your Own Acrylic Pet Portrait
If you’d like to see your pet transformed into a custom acrylic painting, I’d love to work with you.
👉 Commission a portrait now
👉 view my work
If you’re unsure which photo to use or have questions about the process, feel free to get in touch — I’m always happy to help guide you.
William
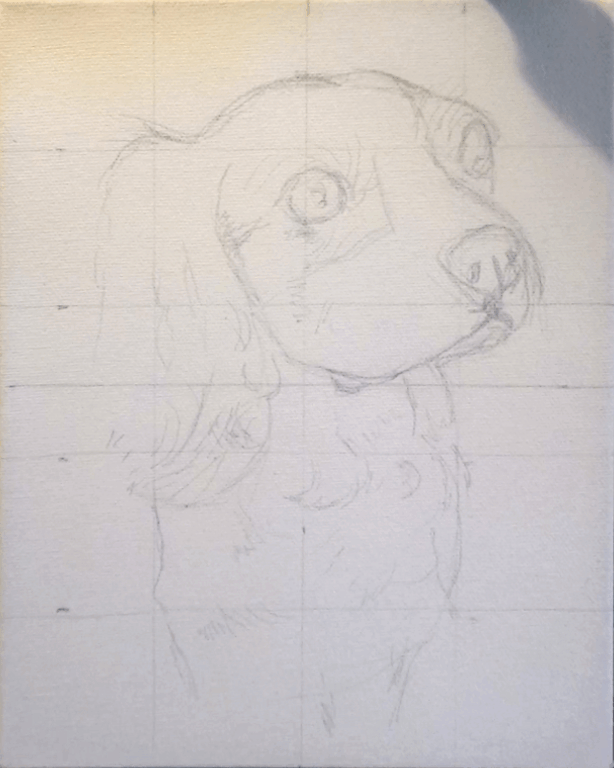
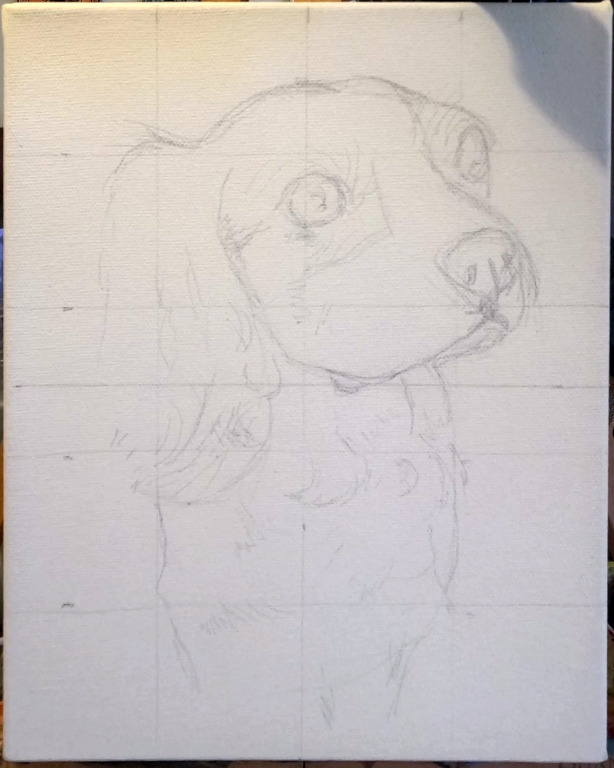
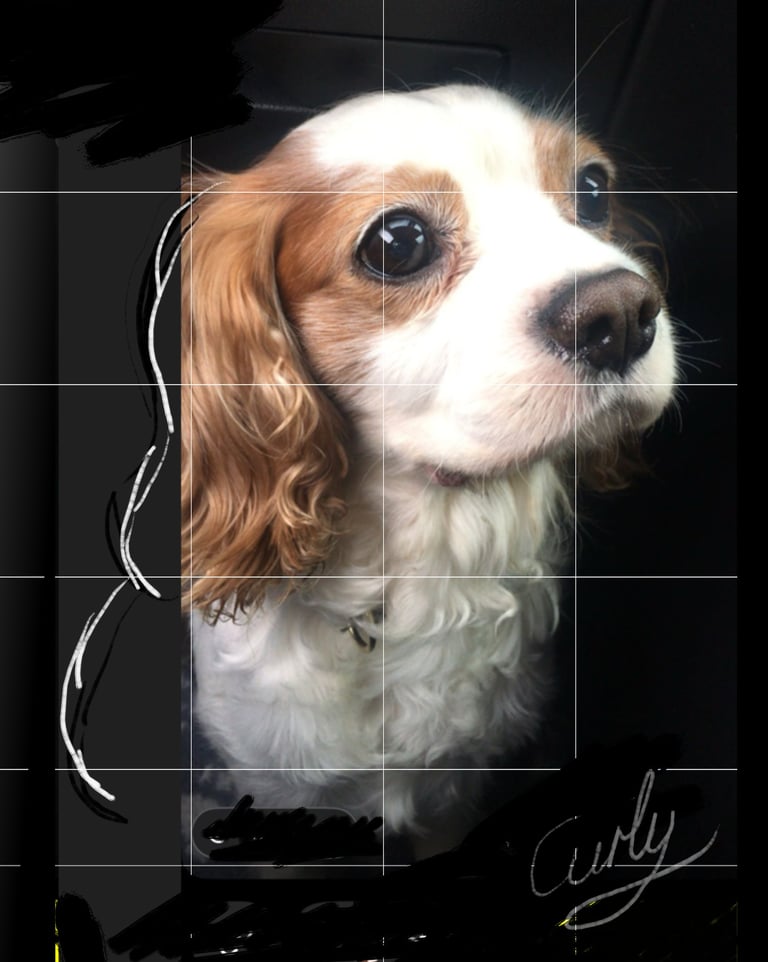
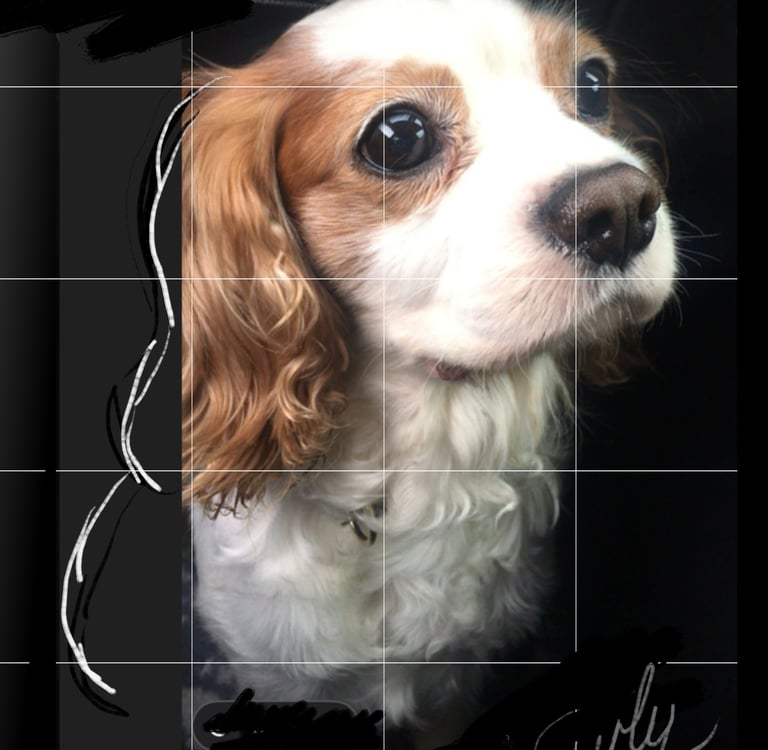
2. Sketching the Portrait Using the Grid Technique
Before any paint touches the canvas, I carefully sketch the portrait using the grid technique. This allows me to accurately transfer proportions from the reference image while maintaining the natural anatomy of your pet. Im not sure if this is an "official" method name, but you'll see why I call it that.
This stage is crucial as correct proportions are the foundation of a realistic pet portrait. Taking the time here ensures the eyes align properly, the muzzle sits naturally, and the overall likeness is strong before colour is added. Its very easy to mess up proportions and I don't begrudge anyone who does tracing for this. There are many other techniques one can do. Some people use projectors to then trace lines on the surface easily. Speciality overlay apps exist for people looking through their phones, though that seems a little awkward.
I find just simply dividing the image in half, and then again. and copying what I see in each grid to be the easiest and simplest method. For the typical canvas sizes also 4 x 5 equal sized squares fit perfectly. And then I'll do the same on the reference image. Can't be easier!
If you're brave you can freehand without a grid, and sometimes I do. but this ensures that things remain true to scale. I wont lie, I've sometimes made some incredibly wonky proportions when things aren't measured out well.
A tip here: step back and look at things from a distance. flip it upside down. both will change your perspective from where you were looking at it while sitting drawing and help you see any irregularities that your brain ignored.


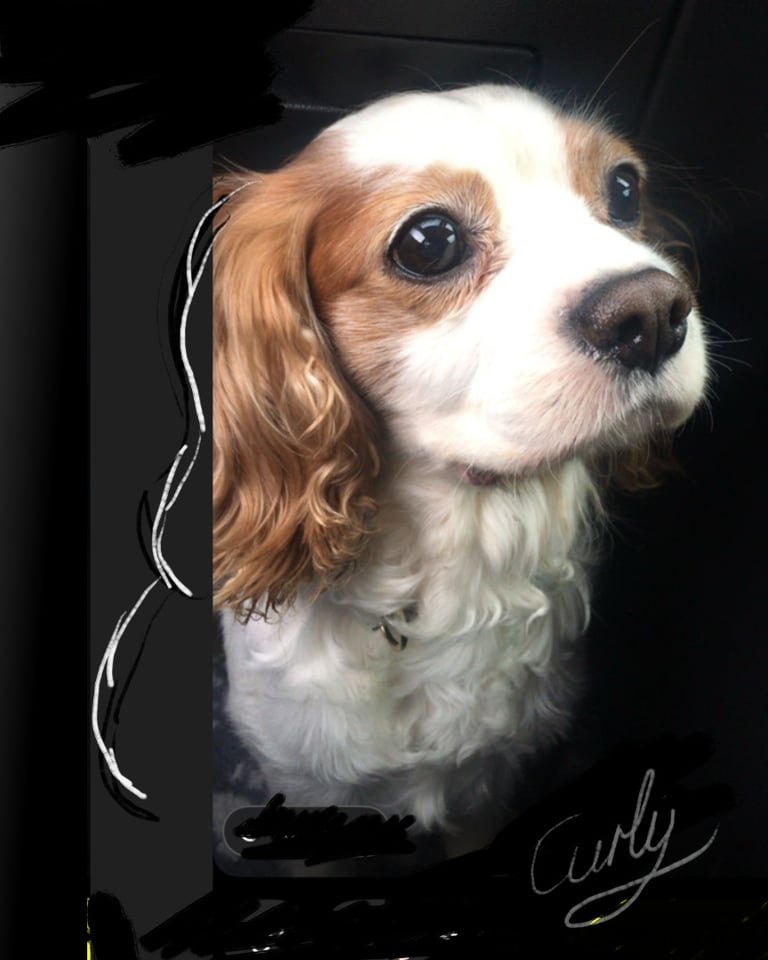
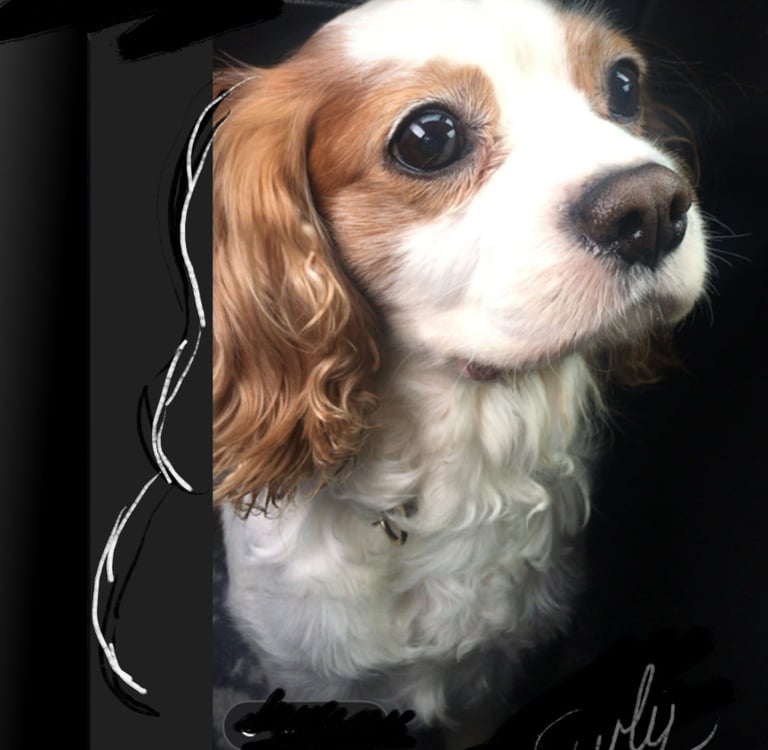
1. Choosing and Composing the Reference Image
Everything begins with the reference photo. A good photo is essential, but it doesn’t need to be professionally taken, what matters most is clear lighting, accurate colours, and your pet’s natural expression.
I look for:
Clear focus around the eyes, they truly are a window into the heart and soul
Natural light (not harsh flash with distracting shadows)
A pose that shows your pet’s personality
More often than not pet lovers will have a whole heap of photos to pick from. or sometimes they have a very specific photo to treasure. Either way, we'll find something that speaks to your heart. (please see the FAQ section on the about page for other photo picking tips)
If needed, I adjust the composition to create a balanced layout that works well on the specific size chosen. This ensures the finished acrylic portrait feels intentional and artistic, not just a direct copy of a photo. Ill often play around with different layouts and colours and rough background colour changes in a digital form to get a feeling for it. Sometimes having to draw in or infer parts or details that may be cropped out or obscured by unwanted objects.
Will & Whiskers
Bespoke pet portraits that celebrate your beloved animals.
If you have any queries or the commision form doesnt work for you, please reach out at:
© 2025. William Ruhlig / Will & Whiskers. All rights reserved.
Privacy Policy - Website Terms of Service
See Google Reviews for Will and Whiskers